Showing posts with label Tiny Norway Pine Multi Step Clear Stamps. Show all posts

Monday, February 12, 2024

Wildlife Birthday

For this week's Kitchen Sink Stamps' sponsored design, I have created a masculine birthday card for an outdoorsman in my circle of friends. I included images from Mallard Ducks, Isle of Big Bay Lake, Simple Sentiments (retired), and Tiny Norway Pine (retired). 

This A2 design started out with a white panel of cardstock with a Distress Oxide blended background. I then stamped the trees onto the panel and attached an SVG cut duck. All inks on the trees and duck are by Altenew. The sentiment was stamped with Versafine Clair Pinecone.


Check out the ongoing sale at Kitchen Sink Stamps


This card has been entered in the following challenges this week:


For additional designs featuring Kitchen Sink Stamps, please visit the blogs and YouTube videos of the members of the Kitchen Crew linked below:


 Kitchensinkstamps' Weblog by Maria Colosimo,


For those wishing to purchase Kitchen Sink Stamps, click SHOP HERE. It will take you directly to the store as well as let Maria know that you are a fan of my work! Thanks so much!!


Monday, August 9, 2021

Tower Card - Kitchen Sink Stamps

For today's Kitchen Sink Stamps sponsored card I am sharing a fun fold called a Tower Card that my sweet cyber friend, Susan McFeggan, taught me. You can read about the construction of this card on this post from her blog, Simply Cards.

I adjusted the measurements just a bit to fit the images I wanted to use. The great thing about this clever design is that it folds flat to fit in an A2 envelope and then stands up as a tower when you remove it from the envelope.

Here is what the card looks like folded flat to go into the envelope.


The pop up piece which in inserted between the tower and the bird's nest panel was constructed with two 2 inch by 2 inch squares (Susan's card uses circles, but it really makes no difference what you choose to use) which were scored down the middle. They were glued score line to score line and allowed to dry. I them folded them flat and glued the back to the flattened tower lining it up on the center score line of each. The bird's nest panel was then glued to the front if this device which allows the bird's nest to pop out when the tower is opened up for standing. How fun is that!!


Here is what you get when you take the card out of the envelope and set up the tower.


The Kitchen Sink Stamps images I used 

to create this card came from the following sets:

Spring Nest

Big Leaves

Build a Pine Branch

Tiny Norway Pine (retired)

Honey Bunny

Tree Friends

Summer Lemons (sentiment)


For additional designs featuring Kitchen Sink Stamps, please visit the blogs and YouTube videos of the members of the Kitchen Crew linked below:


For those wishing to purchase Kitchen Sink Stamps, click SHOP HERE. It will take you directly to the store as well as let Maria know that you are a fan of my work! Thanks so much!!


Monday, December 21, 2020

Jeweled Moose - Kitchen Sink Stamps

This week the Alpha Girls requested cards with jewels. For today's Kitchen Sink sponsored design, I have made a Christmas card featuring the Mighty Moose with the Grand View Mountains and the Tiny Norway Pines (limited edition - retired) in the background. I splattered the front with white acrylic paint and then added a few sparkly jewels to highlight some of the snowflakes. The sky was created using the KSS SVG Cut Cloud Stencil.


 Color Recipe for the Moose with Stampin' Up Inks

Layer 1 Creamy Caramel
Layer 2 Baked Brown Sugar
Layer 3 Close to Cocoa
Layer 4 Chocolate Chip


Color Recipe for the Tiny Norway Pines with Stampin' Up Inks

Layer 1 Garden Green
Layer 2 Always Artichoke on the greens and Baked Brown Sugar on the trunk
Layer 3 Chocolate Chip

I have entered this card in the following challenges:


For additional designs featuring Kitchen Sink Stamps, please visit the blogs and YouTube videos of the members of the Kitchen Crew linked below:


Nancy Stamps by Nancy McCabe


For those wishing to purchase Kitchen Sink Stamps, click SHOP HERE. It will take you directly to the store as well as let Maria know that you are a fan of my work! Thanks so much!!

Wednesday, September 2, 2020

CCEE2036 - Masculine Cards

It's a brand new month, so it's time to introduce our new challenge hostess, talented Australian crafter Frances Byrne. Since Father's Day in Australia on the 1st Sunday in September, Francis has asked the CCEE Stampers to make a masculine card for this week's challenge …. Any occasion … any age, it's up to you.

I went with a masculine birthday design using images from Kitchen Sink Stamps. The sky was created using the Cloud Edger Stencil by A Colorful Life Designs.


Masculine cards can be a challenge for some stampers. Here are links to the masculine designs created by the CCEE Stampers Design Team.


For additional designs featuring Kitchen Sink Stamps, please visit the blogs and YouTube videos of the members of the Kitchen Crew linked below:


Nancy Stamps by Nancy McCabe


For those wishing to purchase Kitchen Sink Stamps, click SHOP HERE. It will take you directly to the store as well as let Maria know that you are a fan of my work! Thanks so much!!

Monday, July 27, 2020

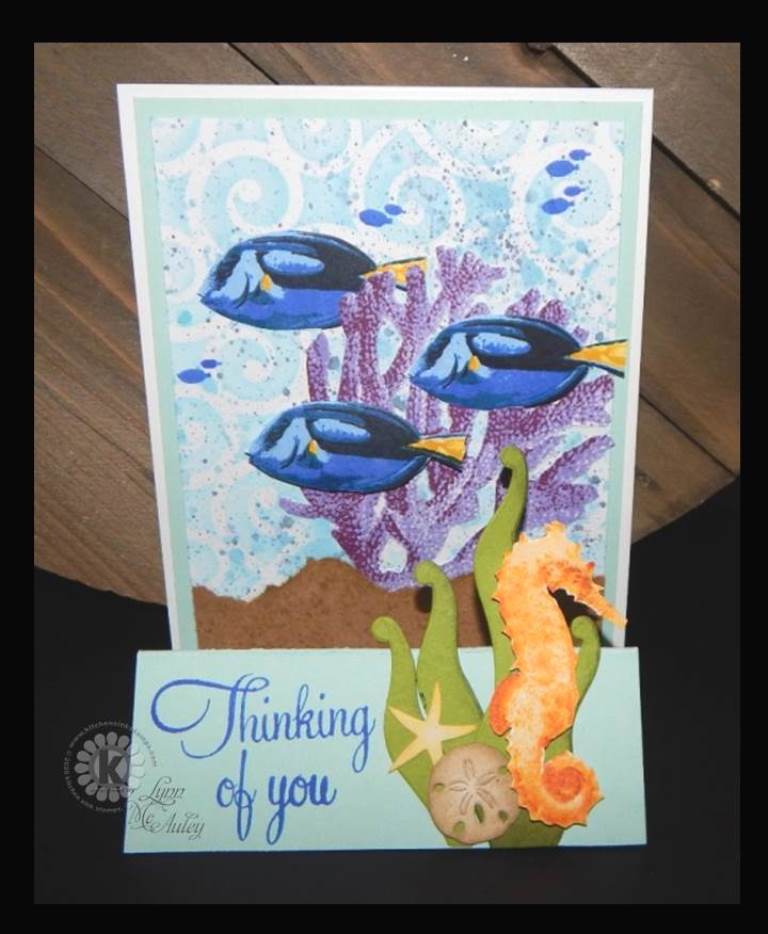
Double Easel Ocean - Kitchen Sink Stamps

This first Kitchen Sink Stamps sponsored card is a simple and fun double easel design using images from the newly released Tropical Fish Multi Step Clear Stamps and the Giant Coral & Seahorse Multi Step Clear Stamps. It is easy to make and looks awesome standing up on a table or windowsill.

I am entering this card in the following challenges:

Stamping Sensations - July Challenge - All Creatures Great & Small

Creative Friday - Challenge #260 - Tropical

Cardz 4 Galz - Challenge #126 - Sea Shells


This first view of the card is what it looks like when it is closed and ready to insert in an A2 envelope.


This view is what it looks like standing on any flat surface.


The stamped images were all stamped with Stampin' Up Inks and fussy cut before they were attached to the card. The color recipes posted below were the colors I used on this design.


The background was created with Tumbled Glass Distress Oxide ink brushed over the Pinwheel Scroll stencil from A Colorful Life Designs and then splattered over with more blue oxide inks. 

The sea grass, starfish, and sand dollar are Cuttlebug die cuts.

The sentiment was stamped with SU Brilliant Blue.

They say a picture is worth a thousand words. I am a true believer in this idea since I am a very visual learner. The pictures below should make it very easy to understand the construction of this card.

The basic construction takes two pieces of paper.

The white cardfront is 4.25 inches  x 11 inches scored at 5.5 into a standard A2 card.
The blue panel is 4 inches x 8.25 inches scored at 1.5 inches and 3 inches.


 Here I have folded the panels on the score lines.


Here I have glued the large portion of the blue panel to the cardfront. See how easy that was!


I am including a second card which I made yesterday and really love so I wanted you to see it. It is a masculine get well design using images from Tree Friends Multi Step Clear Stamps and Tiny Norway Pine which was a limited edition and no longer available.


The clouds and bushes were created with the Cloud Edger stencil also from A Colorful Life Designs.

For additional designs featuring Kitchen Sink Stamps, please visit the blogs and YouTube videos of the members of the Kitchen Crew linked below:


Nancy Stamps by Nancy McCabe


For those wishing to purchase Kitchen Sink Stamps, click SHOP HERE. It will take you directly to the store as well as let Maria know that you are a fan of my work! Thanks so much!!

Monday, March 23, 2020

Wide-Open Spaces - KSS

With today's Kitchen Sink Stamps sponsored design, I am celebrating the wide-open spaces of Texas. 


This tall card was created using images from the following KSS sets:


Tiny Norway Pine Multi Step Clear Stamps - retired

My thoughts and prayers are with each and every one of you during this difficult time of stress and uncertainty. Please do what you must to stay safe and healthy.


For additional designs featuring Kitchen Sink Stamps, please visit the blogs and YouTube videos of the members of the Kitchen Crew linked below:


Nancy Stamps by Nancy McCabe


For those wishing to purchase Kitchen Sink Stamps, click SHOP HERE. It will take you directly to the store as well as let Maria know that you are a fan of my work! Thanks so much!!
Monday, November 11, 2019

Come Rain or Snow - KSS

Normally by this time in November I have all my Christmas cards made, addressed, and ready to drop at the Post Office on the day after Thanksgiving. Sadly, that has not been the case this year. I am really going to have to kick it up a notch to have Christmas cards ready for all my friends and family. So from now until Christmas, you may think this is a Christmas ONLY blog, and it just may be!!


For today's Kitchen Sink Stamps sponsored design I have created this snowy night scene using images from the following KSS sets:


Tiny Norway Pine Multi Step Clear Stamps
(this set is no longer available but Minnesota Norway Pine Tree is)

These are the steps I followed to create the night sky:
   1. Punch a circle and attach it to the white 6 1/2 inch x 4 1/2 inch panel.
   2. Brush the top 3/4 of the panel with Distress Oxide Chipped Sapphire.
   3. Brush in a little Distress Oxide Black Soot.
   4. Flick on tiny droplets of water and dry with a heat gun.
   5. Before adding the snow, I stamped the 3 Norway Pines.
   6. Water down some white acrylic paint and flick on the falling snow.
   7. Remove the moon mask and stamp Santa.

To complete the card, I used watered down Chipped Sapphire to paint the tree shadows and tore an addition snowbank on which to stamp the sentiment. I edged the top of the snow banks with some clear Stickles and called the card done.

Should you need it, here is the Color Recipe for the Norway Pines:


Layer 3 Memento Espresso Truffle
Layer 2 PTI Ocean Tides
Layer 1 Stampin' Up Old Olive

Santa and the Sentiment were stamped with Versafine Onyx Black

For additional designs featuring Kitchen Sink Stamps, please visit the blogs and YouTube videos of the members of the Kitchen Crew linked below:


Nancy Stamps by Nancy McCabe


For those wishing to purchase Kitchen Sink Stamps, click SHOP HERE. It will take you directly to the store as well as let Maria know that you are a fan of my work! Thanks so much!!
Today's card has been entered in the following challenges:


Monday, June 17, 2019

Pulling in the Bass - KSS

I have been having the best time this past week stockpiling fun scene cards in my masculine card basket. This card, sponsored by Kitchen Sink Stamps, was created mixing this fabulous fish image from their newly released Fishing 4 Bass Multi Step Clear Stamps with images from Cabin by the Lake Multi Step Clear Stamps.


I am trying out a new feature on my blog today with the main color recipes I used to create today's card. Instead of just listing the colors, I am going to stamp and photograph the progression of the image and the color used as I stamp it. The order in which I stamped the image will start on the left and read to the right. I usually stamp darkest to lightest, but not always. So sometimes the layers will be out of order, but by reading left to right you will be able to see how I stamped it.

I am starting first with the bass today. My photography on this is not the best on my first try, but I think you get the idea. Be sure to let me know it this is helps you better understand layered stamping.

Color Recipe for the Bass


Color Recipe for the Log Cabin


The bass and the cabin were the only things that needed masking to create this scene.

The trees are images used at last year's Junkie Fest Workshops and are no longer available for purchase.

Find more beautiful creations with Kitchen Sink Stamps images created by the Kitchen Crew and linked below:


This card as been entered in the following challenges:

Crafty Calendar - June - Masculine

Crafty Catz - Challenge 466 - Anythings Goes with Optional Twist: Male/Fathers

Creative Fingers Challenge Blog - Challenge #166 - Anything Goes

Craft Rocket Challenges - Challenge #60 - June 2019 - Summer is Coming

Monday, May 20, 2019

Let the Summer Begin!!! - KSS

Today's one layer card sponsored by Kitchen Sink Stamps celebrates the beginning of my summer. Two friends and I are headed to Mo Ranch (take a virtual tour if you would like) near Hunt, Texas on the beautiful banks of the Guadalupe River at the end May. Which is ALMOST here! I am so excited!


There is so much fun to be had on and around the river, but I doubt I will be in one of the canoes with my klutzy balance. 

Kitchen Sink Sets Used for this Card Include:

Tiny Norway Pine Multi Step Clear Stamps (no longer available)


Color Recipe for the Cabin

Layer 4 SU Soft Suede on the wood and SU Creamy Caramel on the brick
Layer 3 SU Baked Brown Sugar on the wood and Creamy Caramel on the brick
Layer 2 PTI Fine Linen
Layer 1 Memento Desert Sand

Color Recipe for the Tiny Norway Pine

Layer 3 PTI Dark Chocolate
Layer 2 SU Mossy Meadow
Layer 1 Memento Cottage Ivy

Color Recipe for the Lake

Layer 1 Memento Summer Sky
Layer 2 PTI April Rain

Sentiment - PTI Dark Chocolate

Grass - Distress Oxide Peeled Paint


Looking for more KSS inspiration? Here it is:


I am entering today's card in the following challenges:


I am so happy that you came by for a visit today.  I hope you saw something you liked and will want to visit again!

Monday, January 14, 2019

Let's Make a Scene - Winter Birthday KSS

I'm getting a little bit of a late start in posting my Let's Make a Scene design sponsored by Kitchen Sink Stamps this morning, but today is a very amazing day for a dear friend and her family so I wanted to create something very special. My sweet friend is celebrating  her 107th birthday today! What a remarkable feat! She is not accepting gifts at her party this afternoon and actually had her family pass out 107 red roses to our church members yesterday. It is just like her to always think of others first!

With much of our nation blanketed in snow this week, I decided to make a winter theme. I can image that in her youth, Lucile may have had the pleasure of riding in a horse-drawn sleigh through the snow! I will ask her this afternoon at her party!

The frame is popped up over the stamped background and the snowman is popped up on the frame. I crocheted a scarf to add a little fun texture to the design! The sentiment is die cut and angled across the frame.


Kitchen Sink Stamps used include:

Tiny Norway Pine Multi Step Clear Stamps

Color Recipes

Trees
Layer 3 Distress Oxide Gathered Twigs
Layer 1 Distress Oxide Peeled Paint
Layer 2 Distress Oxide Pine Needles

Snowman
Layer 3 Memento  Summer Sky
Layer 2 Memento Summer Sky stamped off
I did not stamp Layer 1 but traced around it with pencil and cut out the snowman.

Hat
Layer 3 Versafine Onyx Black
Layer 2 SU Gray Granite
Layer 1 Memento Summer Sky stamped 3 times

Coal - Versafine Onyx Black
Carrot - SU Only Orange

Sky - Distress Oxide Tumbled Glass

I am entering my card today in the following challenges: