Showing posts with label Make A Big Statement Clear Stamps. Show all posts

Monday, August 22, 2022

Butterfly Birthday - Kitchen Sink Stamps

With this Kitchen Sink Stamps sponsored design, I finally have all the birthday cards I need for August. This birthday design features the largest butterfly in the Butterflies set. The sentiment is from Make a Big Statement. The branch and leaves were created using the Branch and Leaves SVC cut stencil. 


Color Recipe for the Butterfly

Layer 1 - Stampin' Up Tahitian Tide

Layer 2 - Stampin' Up Starry Sky

Layer 3 - Versafine Clair Nocture


The background was created with Distress Oxide Inks in Tumbled Glass, Salty Ocean, and Mermaid Lagoon spritzed with large water drops. Gold acrylic splatters were then added.


For additional designs featuring Kitchen Sink Stamps, please visit the blogs and YouTube videos of the members of the Kitchen Crew linked below:


For those wishing to purchase Kitchen Sink Stamps, click SHOP HEREIt will take you directly to the store as well as let Maria know that you are a fan of my work! Thanks so much!!


Monday, February 28, 2022

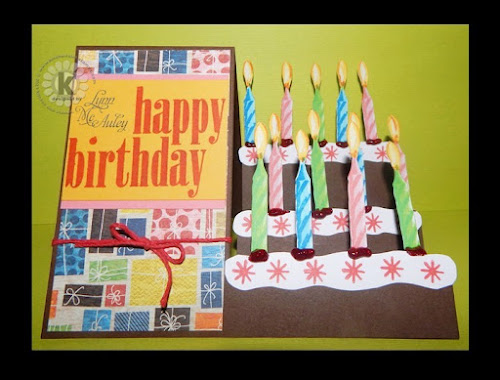
Birthday Cake and Gifts - Side Step Card - KSS

I am continuing to have fun with Candle Wishes recently released by KSS. For today's Kitchen Sink Stamps sponsored design I have created a colorful side step birthday card for a 13 year old friend. I wanted it to look like a tied cake and used BasicGray designer paper which features lots of gift! Things that any new teenager would love! The birthday sentiment is from Make a Big Statement.

I used this wonderful tutorial created by Beate Johns for Splitcoaststampers for the cutting and scoring measurements to cut and fold this design.


Embellishments include red Stickles icing to place the candles on the cake and a red cord bow. Here's hoping this card brightens this sweet teen's birthday.


For additional designs featuring Kitchen Sink Stamps, please visit the blogs and YouTube videos of the members of the Kitchen Crew linked below:


For those wishing to purchase Kitchen Sink Stamps, click SHOP HEREIt will take you directly to the store as well as let Maria know that you are a fan of my work! Thanks so much!!

Monday, June 8, 2020

Flip Card - Save the Date - KSS

This Save the Date card sponsored by Kitchen Sink Stamps again features the newly released Old World Door Multi Step Clear Stamps and Potted Topiaries Multi Step Clear Stamps. I keep finding new ways to use it. How  perfect it is for this flip card which allows you to go behind the door for a garden wedding. 

To create the background for the card, I first used the Crinkled Chalk Technique (although I used Distress Oxide Ink instead) to dab on the grass and sky using some wadded up plastic wrap. I then attached a 1 inch by 8.5 inch strip of brick wall that I had stamped using Tree Friends Multi Step Clear Stamps. The door, the topiaries, and the flowers were stamped on separate panels and cut out for mounting to the card so that the door hid the inside of this simple flip card design. 

The Save the Date sentiment is from Make a Big Statement Clear Stamps while the rest of the date was computer generated.

Card Closed


Card Opened


Color Recipe for the Door
Layer 5 - Altenew Espresso stamped twice
Layer 4 - Altenew Espresso stamped once
Layer 3 - Altenew Mocha
Layer 2 - Altenew Rocky Shore
Layer 1 - Altenew Sand Dunes

Color Recipe for the Clay Pots
Layer 4 - Memento Potter's Clay stamped twice
Layer 3 - Memento Potter's Clay
Layer 2 - Altenew Caramel Toffee
Layer 1 - Memento Cantaulope

Color Recipe for the Greenery
Layer 3 - Altenew Mountain Pine
Layer 2 - Altenew Shadow Creek
Layer 1 - Altenew Grass Field

Color Recipe for the Flowers
Layer 1 - Memento Lady Bug
Layer 2 - Memento Love Letter
Layer 3 - SU Merry Merlot

The crinkle stamping was done with Distress Oxide Inks Bundled Sage and Tumbled Glass. Save the Date was stamped with Versafine Vintage Sepia.

I have entered this card in the following challenges:


For additional designs featuring Kitchen Sink Stamps, please visit the blogs and YouTube videos of the members of the Kitchen Crew linked below:


Nancy Stamps by Nancy McCabe


For those wishing to purchase Kitchen Sink Stamps, click SHOP HEREIt will take you directly to the store as well as let Maria know that you are a fan of my work! Thanks so much!!

Monday, January 6, 2020

Warmest Wishes - Kitchen Sink Stamps

Because this is a busy week for birthdays around my house, my Kitchen Sink Stamps sponsored design is a clean and simple masculine birthday card that celebrates winter, as well. 

This one layer design was created by first brushing in the snowy slopes using torn paper. After adding the blue sky above, I then added the bare trees, the snowy pines, and icy pond. Last came the silhouette figures and sentiment stamped with Versafine Onyx Black.


Kitchen Sink images used to create this design come from
the following sets:


Color Recipe for the Snowy Pine Trees
Layer 1 Stampin' Up Mossy Meadow
Layer 2 Memento Olive Grove
Layer 3 Stampin' Up Old Olive

Color Recipe for the Icy Pond
Layer 1 Memento Summer Sky
Layer 2 Memento Summer Sky
Layer 3 Memento Summer Sky

Today's card is being entered in the following challenges:


Pattie's Creations Design Challenge - Challenge #166

For additional designs featuring Kitchen Sink Stamps, please visit the blogs and YouTube videos of the members of the Kitchen Crew linked below:


Nancy Stamps by Nancy McCabe


For those wishing to purchase Kitchen Sink Stamps, click SHOP HEREIt will take you directly to the store as well as let Maria know that you are a fan of my work! Thanks so much!!

Sunday, April 28, 2019

5 Minute Scrap Masculine Birthday Card

More often than not, I seem to find myself out of time, but one thing I am never out of as a paper crafter is scraps! So today's card sponsored by Kitchen Sink Stamps is a 5 minute masculine birthday card made from scraps and featuring a sentiment from Make a Big Statement Clear Stamps


This card is made even simpler with the use of a stamp platform. I stamped the sentiment on the cardfront first with Distress Oxide Gathered Twigs. I them adhered the three scrap rectangles to the card and over stamped the sentiment two more times using the same Gathered Twigs. Easy Peasy!

The card is made from SU Bashful Blue cardstock and the scraps are all BasicGrey.

The bold sentiments in this fabulous set would be perfect for many different occasions with all those scraps you have piling up in your craft room!

This clean and simple design has been entered in the following challenges this week:

Fun Friday Challenge #112 - Clean & Simple

Aud Sentiments Challenge #225 Happy Birthday Sentiment


Visit the Kitchen Crew:


Monday, September 17, 2018

Birthday Thank Yous - KSS

Since I celebrated my birthday last week, I have the need for a pile of thank you cards. So today's two designs, which are sponsored by Kitchen Sink Stamps and which I created this morning, are both thank you designs - one for my female friends and one for my male friends.

Before I started work, I looked in on the Splitcoaststampers' Challenges of the day to see if I could kill two birds with one stone. Turns out I could. Technique Challenge 708 today was to make a beach scene. Those two words are like music to my ears : beach and scene. I decided that would be perfect for a masculine thank you so here is what I came up with.


KSS Stamp Sets used to create this scene include:


Color Recipe for the water:

Layer 2 - Stampin' Up Blueberry Bushel
Layer 1 - Memento Summer Sky

Color Recipe for the Lighthouse

Layer 4 - PTI Fine Linen
Layer 3 - Stampin' Up Soft Suede
Layer 2 - PTI Dark Chocolate
Layer 1 - Stampin' Up Early Espresso

The beach chair is a die from Impression Obsession.

Clean and Simple Challenge 499 is titled "Frame It." With the carnation, I felt it would made an excellent feminine thank you card.


KSS Stamp Sets used to create this scene include:


Color Recipe for the Flower

Layer 1 - Memento Lulu Lavender
Layer 2 - Stampin' Up Highland Heather
Layer 3 - Stampin' Up Lavender Lace
Layer 4 - Stampin' Up Gorgeous Grape

Color Recipe for the Stems

Layer 1 - Stampin' Up Granny Apple Green
Layer 2 - Stampin' Up Old Olive
Layer 3 - Stampin' Up Mossy Meadow

Don't miss the Kitchen Sink excitement that Maria and Jeanne have posted for you today!

Kitchensinkstamps' Weblog by Maria Colosimo,
the owner and creator of KSS


Nana loves stamping by Jeanne Frontz


Monday, July 23, 2018

Backyard Scene - KSS

For today's Let's Make a Scene design sponsored by Kitchen Sink Stamps I have potted the new Spring Daffodils Multi Step Clear Stamps in the urn from Hydrangea Multi Step Clear Stamps. In recent weeks I have put the daffodils in a basket and in a watering can. As promised last week, today they are in the urn.

This card is going to a friend and her sweet pup who are spending the summer in Denver.
She has sent me lovely pictures of herself and Scooter on their hotel balcony enjoying the gorgeous mountain scenery and crisp, clean air! I'm not sure how we can lure her back to Texas with our broiling heat and relentless sun!


I used two masks to create this design. After stamping the urn first, I placed a mask over it and stamped the daffodils. Next I stamped the dog toward the background of the scene and then added a mask on him. I then brushed Peeled Paint Distress Ink on the grassy area and Peacock Feathers Distress ink on the sky. After removing both masks, I added the frog, the dragonfly, the grasses, and the bold sentiment.

I am entering this card in the following challenge:

Stamping Sensations - July - In my Garden

Kitchen Sink Stamps used in this design:


Color Recipes

I have listed the layers in the order in which I stamped them.

Urn
Layer 4 - Versafine Onyx Black
Layer 3 - Memento London Fog
Layer 2 - Stampin' Up Going Gray
Layer 1 - PTI Soft Stone

Daffodils
Layer 3 - PTI Lemon Tart
Layer 2 - Memento Dandelion
Layer 1 - Memento Cantaloupe
Layer 4 - Memento Peanut Brittle

Leaves and Stems
Layer 1 - Stampin' Up Pear Pizzazz
Layer 2 - Stampin' Up Granny Apple Green
Layer 3 - Stampin' Up Mossy Meadow

Dog
Layer 4 - Memento Espresso Truffle
Layer 3 - PTI Dark Chocolate
Layer 2 - Stampin' Soft Suede
Layer 1 was omitted to leave the rest of the dog white

Frog
Layer 3 - Versafine Onyx Black
Layer 2 - Distress Ink Peeled Paint
Layer 1 - Stampin' Up Lemon Lime Twist

Dragonfly
Layer 1 - Stampin' Up Granite Gray
Layer 2 - Versafine Onyx Black


I am going to take this card to exercise class on Wednesday morning and have all the ladies in our class sign it for my friend! I think she and Scooter will get a big kick out of hearing from us this week!

I am truly honored that you have chosen to visit me this week!
Please leave a comment so that I return the favor!

For Addition KSS Samples please visit the Kitchen Crew:


Monday, July 16, 2018

Daffodils for your Birthday - KSS

While working with the new Spring Daffodils Multi Step Clear Stamps from Kitchen Sink Stamps, I was struck by the fact that the size of the flowers is perfect for placing in several of the other "will hold a bouquet of flowers" types of items in my Kitchen Sink Collection. Things like the urn from Hydrangea Multi Step Clear Stamps, or the glass bowl from Bitty Tulip Bouquet Multi Step Clear Stamps. In past week I have already placed them in a basket from Basket Multi Step Clear Stamps on this card, so today I have placed them in the watering can from Sunflowers Multi Step Clear Stamps.

I need to send out a birthday card to a friend this week so I added a sentiment from Make a Big Statement Clear Stamps and I now have a card ready to go.


You may notice that the top handle of the watering can is missing. This is the process I used to place the daffodils in the can. I first created a mask for the watering can from a PostIt Label and cut it out. I then cut off the top handle and back rim of the mask so that the flowers would appear to be inside the can.


I then stamped the daffodils over the can as shown starting with the leaves and stems first. Once the bouquet was done, I removed the mask and proceeded to stamp the watering can being careful to wipe the ink off of the top handle and rim of each layer before I stamped it. The end result was a beautiful watering can of spring daffodils!

All in all it was a pretty simple process needing only the one mask for the entire card.

I then returned the mask to the watering can to stamp the brick walkway and the fringe of grass.

Here are the Kitchen Sink Stamps I used to create this design:


Color Recipes for today's card:

Daffodil Leaves and Stems

Layer 1 - Stampin' Up Lemon Lime Twist
Layer 2 - Stampin' Up Granny Apple Green
Layer 3 - Stampin' Up Old Olive

Flowers

Layer 1 - Stampin' Up Barely Banana
Layer 2 - Stampin' Up Pineapple Punch
Layer 3 - Stampin' Up Marigold Morning
Layer 4 - Stampin' Up Mango Melody

Watering Can

Layer 4 - Memento Tuxedo Black
Layer 3 - Memento London Fog
Layer 2 - Stampin' Up Going Gray
Layer 1 - PTI Soft Stone

Brick Walkway

Layer 2 - Stampin' Up Creamy Caramel
Layer 1 - Memento Desert Sand

Dragonfly

Layer 2 - Memento Tuxedo Black
Layer 1 - Stampin' Up Going Gray

Papers for this card:
Recollections White and Black
Designer Paper - Everyday Flair by My Mind's Eye

I am entering this card in the following challenges this week:


Thank you for your visit today!!

Monday, April 2, 2018

KSS - Lilacs and Butterflies

I sure wish I didn't know so many people struggling with various health challenges! I hope to bring a little cheer to one of them with this spring time get well card sponsored by Kitchen Sink Stamps.

The images are from Lilacs Multi Step Clear Stamps, Butterflies Multi Step Clear Stamps, and Make a Big Statement Clear Stamps.


Color Recipe for the Lilacs

Layer 4 - Stampin' Up Lovely Lilac
Layer 3 - Stampin' Up Orchid Opulence
Layer 2 - Memento Lulu Lavendar stamped 3 times
Layer 1 - Memento Lulu Lavendar

Leaves - all layers - Memento Bamboo Leaves

Spellbinders' Edge Die, Tulle Bow


The Kitchen Sink Crew

Marie has new spring beauties to share as well. Be sure you drop by:

Maria Colosimo - owner and creator


Monday, October 16, 2017

Autumn Get Well - Kitchen Sink Stamps

Today's card sponsored by Kitchen Sink Stamps is one of the cards I have created for the Falliday Fest over at Splitcoaststampers. You can see all of the challenges in this thread.

For the Block Party Challenge hosted by Ceal participants were to use an acrylic block to stamp a background for the design. I put Carved Pumpkin, Fossilized Amber, and Tea Dye Distress Ink on my acrylic block. After spritzing it with water, I stamped in on my white card front. I then added the leaf from Big Leaves Multi Step Clear Stamps by KSS.

Here is the recipe for the leaf:

Layer 4 Papertrey Ink Dark Chocolate
Layer 3 Stampin' Up Baked Brown Sugar
Layer 2 Memento Morocco
Layer 1 Memento Cantaloupe

I then stamped on the sentiment from Make a Big Statement Clear Stamps using Papertrey Ink Dark Chocolate.

I finished the card off with a splattering of Walnut Stain Distress Ink.


Monday, August 21, 2017

KSS Monday - Bold Birthday

For today's post sponsored by Kitchen Sink Stamps, I have made a bold and bright birthday design. The new Distress Oxide Inks by Ranger are so much fun to work with. They make great backgrounds and pair so perfectly with KSS' Big & Bold Swashes Clear Stamps and Make a Big Statement Clear Stamps. For this card, I created an emboss resist background by embossing the swashes in black before adding the Distress Oxides over them.


Monday, July 17, 2017

Distress Oxides and Layered Stamping

I cannot tell you how much I love the new Distress Oxides from Ranger. I received my shipping notice that the 12 newest colors are winging their way to my house this week. Unable to contain my excitement, I pulled out my old ones to create this colorful design sponsored by Kitchen Sink Stamps. The images are from Carnations Multi Step Clear Stamps and Make a Big Statement Clear Stamps.

Monday, May 22, 2017

On the Beach at Sunset

I am back today with another Let's Make a Scene design sponsored by Kitchen Sink Stamps. It celebrates the end of school and the beginning of summer vacations for most folks around here. Like many of them, I am anxious to head to the beach for a little R & R!

Images used to create this scene come from the following Kitchen Sink Stamp sets:

Palm Trees Multi Step Clear Stamps
Cabin by the Lake Multi Step Clear Stamps
Tree Friends Multi Step Clear Stamps
Sail Boats Multi Step Clear Stamps
Make a Big Statement Clear Stamps


Also creating with Kitchen Sink Stamps:


Sunday, May 7, 2017

Apartment Window - KSS

For Let's Make a Scene #50 sponsored by Kitchen Sink Stamps, I made this peek into an apartment window into a quick and simple birthday card. The bricks were created with Studio 490 Stencil Basically Bricks sponged with fired brick Distress Oxide. The window is a die from Poppy Stamps. The images come from Basket Multi Step Clear Stamps, Get Well Teddy Multi Step Clear Stamps, and Make a Big Statement Clear Stamps.


Monday, April 17, 2017

Fun Fold 07 with KSS

Fun Fold #7 sponsored by Kitchen Sink Stamps is a simple window box frame folded from a 5 x 5 inch piece of designer paper. I marked dots at  2.5 inches on each side and then scored the paper as shown in the first photo.


Here the paper has been scored and folded:


For the first sample, I added a 3.5 white panel inside for stamping. On the last two I stamped directly on the designer paper.


Kitchen Sink Stamps Images Used:


Kitchen Sink Stamps Images Used:


Kitchen Sink Stamps Images Used