Monday, September 30, 2019

Coffee, Please! - KSS

I am starting today exactly the way I start every morning, by putting on a pot of my favorite coffee! I guess you could say it is an obsession. I can't start my day without it!

So you know for sure, how excited I am that my two Kitchen Sink Stamps sponsored cards this week were created with two brand new coffee sets being released by Kitchen Sink Stamps tomorrow.

The first set is called Keep Calm Coffee Mug. It is a simple, unadorned mug ready for you to stamp with the words or designs of your choice. The set comes with a fun mix of sentiments which are coffee related, of course.


Kitchen Sink Stamps Used in this Design


Color Recipe for the Coffee Mug:
Layer 4 Stampin' Up Pretty in Pink stamped twice
Layer 3 Stampin' Up Pretty in Pink
Layer 2 Stampin' Up Pretty in Pink
Layer 1 Memento Angel Pink

Color Recipe for the Dogwood:
Layer 4 Stampin' Up Strawberry Slush
Layer 3 (petals only) Stampin' Up Strawberry Slush
Layer 3 (center only) Stampin' Up Certainly Celery
Layer 2 (petals only) Stampin' Up Regal Rose
Layer 2 (center only) Stampin' Up Certainly Celery
Layer 1 (petals only) Stampin' Up Pretty in Pink
Layer 5 Stampin' Up Lucky Limeade

Color Recipe for the Spoon
Layer 3 - Memento London Fog
Layer 2 - Stampin' Up Granite Gray
Layer 1 - PTI Soft Stone

Sentiment and Steam - Memento Espresso Truffle


The second set is called Coffee & Friends Multi Step Clear Stamps and also has a great assortment of fun sentiments. All the images on this card come from that set.


Color Recipe for the Coffee:
Layer 4 Stampin' Up Baked Brown Sugar
Layer 3 Stampin' Up Creamy Caramel
Layer 2 Memento Desert Sand
Layer 1 PTI Fine Linen

Color Recipe for Coffee Cup:
Layer 4 PTI Hawaiian Shores
Layer 3 PTI Aqua Mist
Layer 2 PTI Aqua Mist
Layer 1 PTI Aqua Mist stamped off once

Sentiment - Memento Espresso Truffle


This card has been entered in the following challenges:


I can tell already that I am going to have a great time crafting cards for my coffee-drinking friends with these two fabulous sets!! My mind is spinning with ideas!!

Thanks for visiting today! If you love coffee like I do, head over to 
Kitchen Sink Stamps
tomorrow morning and add these wonderful sets
to your stamp collection!

For additional designs featuring Kitchen Sink Stamps, please visit the blogs and YouTube videos of the members of the Kitchen Crew linked below:


Nancy Stamps by Nancy McCabe


For those wishing to purchase Kitchen Sink Stamps, click SHOP HEREIt will take you directly to the store as well as let Maria know that you are a fan of my work! Thanks so much!!

Wednesday, September 25, 2019

Simon Says Stamps STAMPtember

There is a lot of excitement in the Kitchen today! Simon Says Stamp has been celebrating their 10th Anniversary of STAMPtember all month long, and TODAY they are featuring a fabulous new holiday set designed just for them by Kitchen Sink Stamps.

Gingerbread Hugs is a fun and versatile set that can be used for cards, tags for baked goods or packages, and gift presentations of all kinds. You can purchase it here at Simon Says Stamp.

I am sharing with you a tutorial on how to create this cute treat box with a sleeve included to hold a gift card.


This gift presentation is created with 2 pieces of heavy-weight card stock. A piece of white cardstock 7.5 inches by 7.5 cut and scored as shown below. The needed red panel is 4 inches by 5 inches. 

For this size box the score lines to create the box are each 1 and 6/8 inches apart. 
All the scoring should be done before stamping, but do not cut the panel until your stamping is done. This makes for easier placement of the images and more stable use of your stamp positioner.


Begin by stamping the Peppermint Kisses sentiment at the bottom edge of the 2nd box panel from the top. The top is the edge with the half inch score line for tucking the box closed after the candy are added. I then stamped peppermints across box panels 1 and 2. Stamp directly across the folds. I should have stamped all the way to
both side edges which I will remember to do next time.


This is the color recipe I used to stamp the peppermints: Layer 1 Memento Lady Bug, Layer 2 Memento Love Letter, and Layer 3 Stampin' Up Lovely Lipstick.


Now you can cut the pieces that need to be removed.


Next, die cut an opening in the first panel of the box to create a peek-through panel to see the treats inside. In this photo I forgot to trim angles on the side panels beside the acetate window, but you can see them in the photos below. These angles make it easy to open and close the box from the top once it is completed.


Flip the box over and attach a rectangle of acetate over the opening using sticky tape.


You are now ready to attach the candy box to the gift card holder panel.  With the stamping side down, align the bottom 4 x 1 6/8 panel to the bottom edge of the 4 x 5 red panel with sticky tape. It is easy in this photo to see the extra angled cuts I put on the top end flaps for tucking into the candy box.


Finally the box can be folded up and taped closed except for the top opening and closing lid.


Extra pieces were stamped and fussy cut for decorating the gift holder portion of the box.

This is the color recipe I used to stamp the gingerbread men: Layer 3 Stampin' Up Baked Brown Sugar, Layer 2 Stampin' Up Creamy Caramel, Layer 1 Stampin' Up Barely Banana. The buttons were stamped with Memento Love Letter while the icing details were stamped with PTI Dark Chocolate.


Add the decorated panel of our choice to create the gift card holder. I clipped the top with a circle punch to make for easy insertion and removal of the gift card.  I used very skinny sticky tape on the two side edges and the bottom edge of my designer paper. I also added a gift tag. I hope you have fun with your Gingerbread Hugs. I think it is a great way to dress up your home baked goodies and treats for the holidays.


A huge thank you goes out to Simon Says Stamp for inviting Kitchen Sink Stamps to have a fun part in their wonderful event! Happy shopping!!

For additional designs featuring Kitchen Sink Stamps, please visit the blogs and YouTube videos of the members of the Kitchen Crew linked below:


Nancy Stamps by Nancy McCabe


For those wishing to purchase Kitchen Sink Stamps, click SHOP HEREIt will take you directly to the store as well as let Maria know that you are a fan of my work! Thanks so much!!

World Dream Day - CCEE1939

CCEE September Hostess, Frances Bryne has one more challenge for the CCEE Stampers before the month comes to an end. I hope you have all enjoyed her challenges for September as much as I have!

The 25th September was World Dream Day. So for our challenge this week Frances has asked the CCEE Stampers to create a card with someone/something sleeping/dreaming.


Here are links to the dreamy cards of the CCEE Design Team Members:

Monday, September 23, 2019

Flip Flap Interactive Card

I have been busy working on some samples for some new Kitchen Sink Stamps sets coming out in the next few weeks, so I didn't get today's card designed until TODAY! I hate when that happens, but sometimes it does!

And when it does, I usually check in at Splitcoaststampers to see what kind of challenges they have posted for the day. The Clean and Simple Challenge was to create a card with candles. That didn't appeal to me so I moved on to the Try a New Technique Challenge. Sabrina Friel, the hostess for this challenge, asked participants to create a Flip Flap Card. Well, I don't usually go in for fancy folds as they require too much precision and fiddling around to get them to work properly. After reading the SCS tutorial by Beth Rush and watching her YouTube video twice, I decided to give it a go.

So here are two views of today's Kitchen Sink Stamps sponsored card:

Here are the results of my efforts:

Front


Pull the tab and:


Kitchen Sink Stamp Sets Used:


Color Recipe for the Hat
Layer 4 - PTI Dark Chocolate
Layer 3 - SU Baked Brown Sugar
Layer 2 - SU Creamy Caramel
Layer 1 - PTI Desert Sand
Layer 5 - Memento Pistachio

Color Recipe for the Creel
Layer 4 - PTI Dark Chocolate
Layer 3 - Memento Potter's Clay
Layer 2 - PTI Fine Linen
Layer 1 - Memento Desert Sand

Recipe for the Bass
Layer 4 - Versafine Onyx Black
Layer 3 - SU Old Olive
Layer 2 - SU Sage Shadow
Layer 1 - SU Barely Banana

 This card was entered in the following challenge:


Stinkin' Inkers Challenge Blog - Fancy Folds

For additional designs featuring Kitchen Sink Stamps, please visit the blogs and YouTube videos of the members of the Kitchen Crew linked below:


Nancy Stamps by Nancy McCabe


For those wishing to purchase Kitchen Sink Stamps, click SHOP HEREIt will take you directly to the store as well as let Maria know that you are a fan of my work! Thanks so much!!

Wednesday, September 18, 2019

CCEE1938 - Talk Like a Pirate


Ahoy there me Hearties!!!!

It's challenge time for the CCEE Stampers!

Today is Talk Like A Pirate Day, so grab those pirate stamps/dies to create your card this week. If you have no pirate stamps, think beach, ocean or treasure.


The ocean designer paper is from Divinity Designs, LLC.
The sentiment is from Llama Fiesta by Sizzix.
The Jolly Roger is a die  from Cuttlebug.

What pirate adventures await you with the CCEE Design Team?
Check it out!

Monday, September 16, 2019

Inlaid Dies and Autumn - KSS

Today's clean and simple design sponsored by Kitchen Sink Stamps features an autumn theme and inlaid dies. I am a huge coffee fan as are many of my friends so I am currently working on a stash of coffee themed cards.

The Kitchen Sink sets used to create this design include:


Cup of Warm Comfort Multi Step Stamps (no longer available)

I inlaid two die cuts for this design:

Coffee Cup Die by Spellbinders
Coffee Sentiment by Divinity Designs


Color Recipe for the Pumpkin

Layer 5 - Memento Morocco
Layer 4 - Stampin' Up Only Orange
Layer 3 - Memento Tangelo
Layer 2 - Stampin' Up Mango Melody
Layer 1 - Stampin' Up Marigold Morning


Color Recipe for Leaves and Vines

Layer 1 - Memento Bamboo Leaves
Layer 2 - Stampin' Up Old Olive
Layer 3 - Stampin' Up Mossy Meadow

For addition designs featuring Kitchen Sink Stamps, please visit the blogs and YouTube videos of the members of the Kitchen Crew linked below:


Today's design is entered in the following challenges:


Wednesday, September 11, 2019

CCEE1937 - Honey Month

According to Frances Byrne, September CCEE Hostess, this month is Honey Month, so for our challenge this week she has asked the CCEE Stampers to use this as our inspiration…. Honey, bees, bears, even stamp companies that have honey in their name!

So I pulled out my newest bee die (Elizabeth Craft Designs), a BEE sentiment (Stampabilities) and a roll of bee washi tape.


For more BEEutiful designs check out the creations of the CCEE Design Team:

Monday, September 9, 2019

Canadian Birthday - KSS

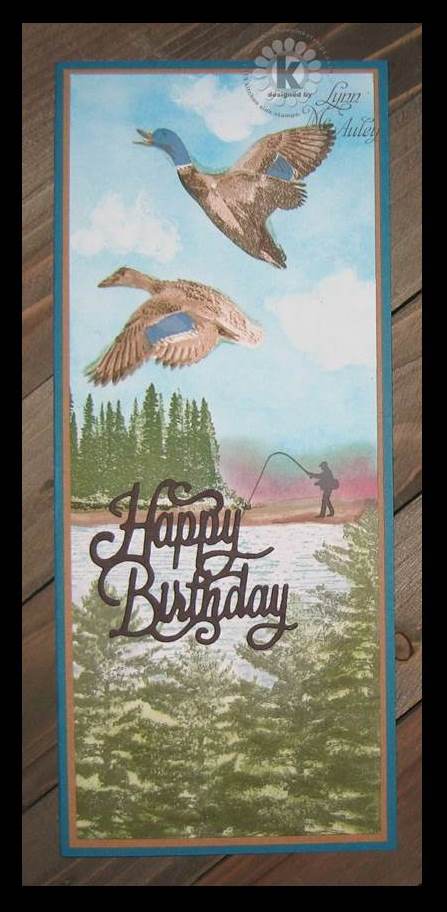
Today's Let's Make a Scene Design sponsored by Kitchen Sink Stamps is going in the mail to a friend who just returned from a Canadian vacation. Hope it brings back wonderful memories of that fabulous trip! It's still a hundred degrees here in Texas!!


To create this design I started with the Norway Pines across the bottom of the card and then added the lake working my way up from there.

The die cut Happy Birthday sentiment is by Darice.

The following Kitchen Sink Stamp sets were used to create this tall card which measures 3.75 inches by 9.25 inches.


Created for the following challenges:

Dragonfly Dreams Challenge - Happy Birthday

Creative Friday Challenge #238 - Bingo - Stamping - Stamp - Colorful

Pattie's Creations Challenge 162 - Things That Fly

Moving Along With the Times. - Challenge 105 Things with Wings


For additional designs featuring Kitchen Sink Stamps, please visit the blogs and YouTube videos of the members of the Kitchen Crew linked below:


Nancy Stamps by Nancy McCabe


For those wishing to purchase Kitchen Sink Stamps, click SHOP HEREIt will take you directly to the store as well as let Maria know that you are a fan of my work! Thanks so much!!

Wednesday, September 4, 2019

CCEE1936 - Skyscraper Day

It's a brand new month, so of course that means it's time to introduce our new CCEE September challenge hostess which is Frances Byrne!

Frances tells us that the 3rd September was Skyscraper Day. She has therefore challenged the CCEE Stampers this week to make tall cards. What fun!!

I have created a tall masculine birthday design with my new Art Impressions set Sloth-some. The designer paper is Mirelle Coverlet by s e i.


Here are the tall cards created by the CCEE Team:

Monday, September 2, 2019

A Fisherman's Anniversary - KSS

While at the CKC Scrapbook Convention in the Woodlands recently, was able to add this  new Photo Collage Pop-up die set by Karen Burniston to my collection.

Today I decided to pull it out and try it for the first time with my Kitchen Sink Stamps sponsored Fisherman's Anniversary Card. There is a learning curve to using this die set, but for my first attempt, I am pretty happy! I know I will get better and faster (it took me 2 and 1/2 hours to stamp and make this card today) with repeated use, because Karen's tutorial is very clear. You can watch it below to see how the card goes together.


Here is the front of my card:


And here is the inside of my card:


Kitchen Sink Stamp Sets Used


The designer papers are from Outfitters by Pink Paislee.

For additional designs featuring Kitchen Sink Stamps, please visit the blogs and YouTube videos of the members of the Kitchen Crew linked below:


Nancy Stamps by Nancy McCabe


For those wishing to purchase Kitchen Sink Stamps, click SHOP HEREIt will take you directly to the store as well as let Maria know that you are a fan of my work! Thanks so much!!