From start to finish, the steps below took me one hour and 10 minutes. I was slowed down a little by the photography. Also note that I do stamp my layers using the MISTI which allows for easy restamping for color intensity
Step One:
Stamp layer 3 of the wheel base of the truck using Versafine Onyx Black twice.

Stamp layer 2 of the wheel base of the truck using Memento London Fog.

This next photo shows how layer 1 is lined up for stamping.

Layer 1 of the wheel base was then stamped with Papertrey Ink Soft Stone.

Now it is time to add the body of the truck. I started with layer 3 stamped 4 times with Papertrey Ink Classic Craft. (It is somewhat blotchy because my pad needs reinking and I haven't ordered the reinker yet).

Next I stamped layer 2 of the truck body twice also with Papertrey Ink Classic Craft.

Then I stamped layer 1 of the truck body twice with Papertrey Ink Fine Linen.

The last layer of the truck body (layer 4) I stamped with Papertrey Ink Dark Chocolate.

Now it is time to mask the truck to stamp the background. As you can see from the ink, I store my mask and reuse it over and over with the truck. The square post it below the truck keeps the tree trunks from stamping on the card front below the truck.

I then stamped layer 2 of the birch trees over the truck using Memento Espresso Truffle.

Next came layer 1 stamped with Papertrey Ink Classic Craft.

Then it was time to mask the tree trunks. I store and reuse these masks as well!

I then torn a horizon to lay across the entire card front to sponge in the sky with Papertrey Ink Aqua Mist.

Here it was time to remove the horizon mask and the tree truck mask.

The next masks were quickly torn panels for sponging on the road below the truck. I tapped in some Memento London Fog to create it.

At this point all masks were removed making it clear that one final masking needs to happen. We need to be able to see the birch tree trunks through the right truck window.

To accomplish this, I repositioned layer 2 of the birch tree trunk in the same place it was stamped originally.

Now using 4 post it notes, I masked off the truck by framing the window.


Now all the masking has been completed.

I added the grazing deer and grass sprigs on the hill and by the road.

I then added a torn strip of glitter paper across the bottom and trimmed the card on all 4 sides.

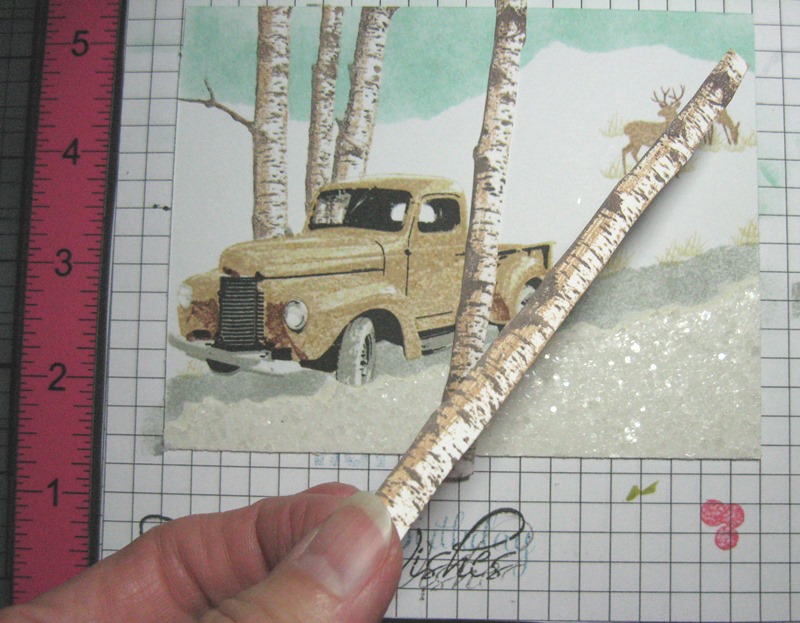
The last things added to the card before the final trim were extra birch tree trunks which had been stamped and cut from another piece of cardstock.

One last trim and the scene is ready for use on the card or project of your choice. Happy stamping!

Your cards is really fantastic!
ReplyDeleteYour cards is really fantastic!
ReplyDeleteBrilliant masking and stamping. Yhanks for sharing the tutorial. Now i have to buy these stamps... :)
ReplyDeleteI knew there were several steps to your designs when you create your scenes and alot of masking involved too!! You gotta love those MISTI tools for lining things up!! ;) Thanks for sharing your wonderful tutorial!! HUGS
ReplyDeleteThis was an awesome tutorial! I'm so jealous that you have a MISTI! I want one!
ReplyDeleteWOW, great tutorial! Love your scene.
ReplyDeleteI love this picture tutorial- WOW- this is a gorgeous card!
ReplyDeleteThanks so much for sharing the magic behind the masterpiece!
ReplyDeleteWOW, Lynn! I just treated myself to this set and was going to use it today! Glad I saw this! If I get the trees to work out, I'd LOVE to try your design! This is fabulous~
ReplyDeletePlease don't tell me this was only a 20 minute card. wow....thank you so much for taking us behind the scenes step by step on how you create your stunning scenes.
ReplyDelete